
Compressor, Maximizer Functions
With the compressor, we can control the dynamic range of the sound. It is possible to produce a result with it similar to a limiter or maximizer, meaning we can increase the volume, but it will hold back the excessively strong amplitude values. In some cases, we can achieve the reverse effect. That is, we can make our sound that has lost its dynamics more dynamic again. This latter option is most effective when used on solo tracks rather than complex music. Of course, this does not exclude using the compressor on more complex sounds to increase dynamics, but in the case of dense, continuous signals, we can only refine the sound. In this latter case, using the compressor is more suitable for maximizing the average volume ratio, which causes a decrease in dynamics. In the case of complex sound patterns, we use a multiband compressor. In terms of function, it does the same thing as a traditional compressor, but it divides the signal's frequency range into low, mid, and high ranges, which can be controlled separately. Its advantage is that the setting we make in one range is not carried out in the other ranges. The dynamic range is the value in decibels between the loudest and softest amplitude peaks. If this is large, then our music is dynamic.
Let's say we have a sound with maximum amplitude peaks, but in some places, the signal strength is weaker. To modify the signal, we need to control the following settings.
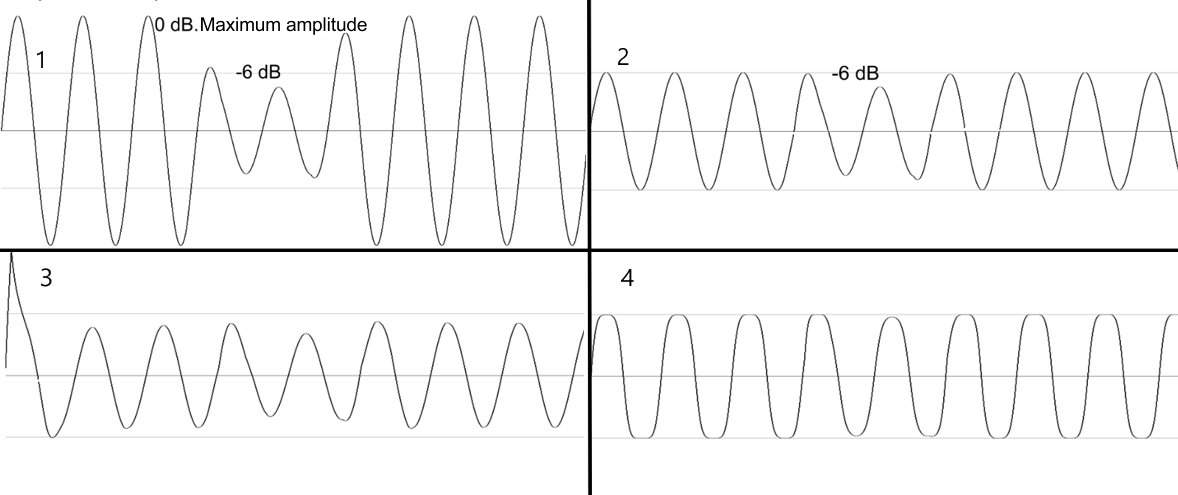
Threshold value: The value given in dB at which the compressor starts to modify signals with higher amplitude than the volume value. So if the amplitude peaks in our sound are maximized at 0 dB, and the threshold is set to -6 dB, then the compressor will reduce the signal's volume by 6 decibels, but only if the ratio is at least 10:1. The second image shows this situation. Compared to the first image, we can see in the second image that the compressor set to 0 attack and -6 dB threshold reduced the amplitude peaks to -6 dB volume, but did not modify signals weaker than that.
Attack: The starting time of signal modification, given in milliseconds. If this value is zero, the compressor immediately executes the modification on those amplitude peaks where the signal strength exceeds the threshold value. If it is 5 ms, then it will only start this modification with a delay of 5 ms. In comparison to the first image, we can see in the third image that the attack value is not zero, meaning that it reduced the peaks with a delay.
Release: If a change has occurred based on the attack and threshold values, it can be specified how long the signal should take to try to return to its original state. If the attack value is 0, this state will never occur because the attack wants to immediately perform the volume reduction. In this case, the attack and release are working against each other.
If the release time value is long, the modified signal will take a long time to return to its original shape. If it is short, the waveform will try to return to its original shape as quickly as possible, but if the attack value is 0, it will prevent this. In this case, the signal is modified based on the fourth image. It can be seen that with a short release time, the peaks become more rounded and angular. With a very small release time, the chance of distortion increases. The two functions are in conflict with each other.

As much as possible, use short time only when the other settings do not make extreme modifications!
Ratio: This is a pair of ratios. If the ratio value is 1, or 1:1, regardless of the other parameters set, the compressor will not make any changes. If the ratio value is at least 10:1, then the threshold can maximally enforce the limiting of volume peaks. The ratio value mostly influences the operation of the threshold. If the original signal at a 2:1 ratio were to go 1 dB above the threshold level, then the sound will exceed the threshold value by 0.5 dB. In the case of a 3 dB overshoot, the signal will exceed the threshold by 1.5 dB.
Gain, or make-up: This can increase the output volume of the already modified material.
Input gain: Here, we can increase or decrease the unmodified volume to the level where the compressor ideally performs the intervention.
Now we know in theory how the compressor works, but practice is very important with this tool. If we have time, we should adjust the settings to verify what is described here! Feel the operation! Without this, the compressor will not be a docile lamb.
The maximizer works similarly to the compressor, but some features are missing. Since the attack value is fixed at zero, there is no such setting option. There is also no ratio value because it is at its maximum value in this case. In some plug-in software, there is a release time setting, but it allows only minor intervention. What significantly changes in this case is the function of the threshold. Here, we do not specify how many decibels we reduce the amplitude peaks, but how many decibels we increase the input volume. With this function, we essentially push the amplitude peaks to the maximum value of 0 dB or to the value we specify. This increases the overall volume of the signal, but reduces its dynamics because the distance between individual amplitude peaks decreases. If we use it gently, only the loudest signal peaks are pushed to the limit. If we use the threshold value more aggressively, then there will be too much intervention in too many places. If there are a lot of low bass frequencies in the given band, they can be cut off with an EQ. Since these frequencies are the loudest in the signal stream, using an EQ before the compressor/maximizer creates some leeway. This can help us shape the volume in the desired way if the intervention is otherwise significant.